|
|
|
|
» WALKTHROUGHS
|
|
Page Content...
WALKTHROUGHS/MIDORI PROVINCE/CHASM OF SCREAMS
/cursor on number brings up description
/
http: legend
/
http: map
This dungeon is fairly straightforward, but there are a couple tough battles in here, so have your party at full health before entering.
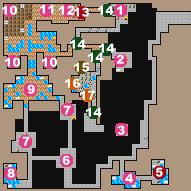
Upon first entering you'll find yourself on a narrow ledge that runs around a chasm. On the other side of the chasm are a variety of Undead, which you should use distance attacks to kill rather than trying to sneak your way past them all.
The first Undead on the other side are Ruby Skeletons, and after them come some Spirits. Finally, on a small platform in the middle of the Chasm is a Living Statue.
Shortly after the Living Statue you should see a side passage leading south. There's some Ice Lizards in here, guarding some bodies, which are in the eastern section of the room. Check the bodies for bows and crossbows, bolts and arrows, as well as a Magery Charm.
Go back to the passage running along the Chasm and head west. You should shortly come across some Spectres which you can reach easily. There's also some Fetid Zombies around here, which you want to kill as quickly as possible. If they manage to bite you they'll cover you with acid.
Once you've cleared the area of Spectres and Fetid Zombies head to the southwest corner of the dungeon to fight a few Ice Puddings.
After killing the Ice Puddings head north along the western edge until you enter a room with some Ice Lizards and some Ice Drakes. After killing them stop here to prepare yourself for a tough battle.
The next room to the north contains three Nagas, one to the east of the entrance, one to the west of the entrance, and one up on a platform that you have to climb several stairs to reach. Climbing the stairs puts you within range of some Basilisks hiding behind Force Barriers in the northeast corner of the room, so it would probably be best to hammer away at that Naga from the bottom using distance attacks. After killing all three Nagas you will have completed the quest for the Mayor of Marish, but since you're here anyway you might as well finish off the dungeon.
Make your way to the northeast corner of the room, but go into combat mode before stepping around the corner. If you're lucky you'll manage to kill the Basilisks between the barriers before they manage to attack you, but just to be safe you might want to equip your party with items that will protect them from petrification, or cast Radiant Shield if you have it.
You'll be attacked by a Black Shade as you make your way through the barriers, and once you get through you'll also have to fight a Guardian. Once you've managed to kill both of them check out these chests, all of which are trapped, for a variety of items, including a Resistance Ring and a Warmth Charm.
There's a secret passage at the end of this tunnel, past a Mossy Boulder which will take you out onto the platform where the Ruby Skeletons were. You might want to go out there to see if they dropped any rubies when you killed them.
There's another passage leading off this platform just to the south of the secret passage, blocked by a couple stalactites. This passage will take you into a short passage that leads off the southeast corner of the room where the Nagas are.
The end of that passage leads out to where the Spirits were, but along the southern wall, shortly before the end is the most important secret passage of this dungeon.
You'll need to get through another stalactite to enter this room, but once you're in you'll see three pedestals in the room. The one in the northwest corner teaches Summon Shade Lv.3.
Before looking at either of the other two pedestals prepare yourself for a tough battle. The pedestal against the western wall will summon 6 Vile Imps, one of whom will drop a Sticky Charm when killed. Looking at the pedestal to the south will summon 2 Efreet, one of whom will drop a Divine Aid Mind Crystal when slain.
Once you're done in here it's time to head back to Marish to get your reward from the mayor.
|
|
|
|
|
