|
|
| |
ģ WALKTHROUGHS |
|
Page Content... WALKTHROUGHS/ISLE OF BIGAIL/LAIR OF DRAKOS
/cursor on number brings up description
/http: legend /http: map
 |
 |
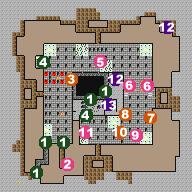
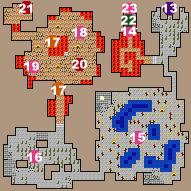
| /Upper Lair | /Lower Lair |
NOTE: You must have learned the location from the book in the Gale
Library, Gale, Monoroe Province before you can enter the Lair of Drakos.
The only way to enter the Lair of Drakos is through a secret passage in
the southwest corner of the map. The doors are all guarded by runes
that you won't be able to get past.
When you first enter through the secret passage immediately check the
same wall just to the east of where you entered. You'll find another
secret passage leading to a small room containing some Spectres who
apparentely are guarding a couple augmented items.
Now advance north, stopping at the edge of the Cloud of Blades. You're
going to have to cross through here, so you might want to shield your
party if you can. You can't step on the green runes, so make your way
around them, and as soon as possible move to the eastern wall. There's
a pillar that appears to be blocking your way, but you can actually
walk right through it.
In the northwest corner of the room is a cracked section of wall that
you can use Move Mountains to get through. I can't remember exactly
what was in the coffin, but it wasn't really anything too interesting,
as I recall.
As you make your way towards the northeast corner you'll trigger an
ambush by a few Efreet. Once you've killed them continue along, but be
aware that you're soon going to come within the range of a couple Ice
Drakes sitting on platforms just around the corner.
Once you've killed the Ice Drakes you're going to have to pass between
their platforms. Unfortunately for you, this area is filled with
another Cloud of Blades. Once you're through use Dispel Barrier or a
few Piercing Crystals to get through the barriers. You want to pull the
lever that's south of the Drake Platforms. This will cause stairs to
appear on the south side of their platforms, as well as causing some
pillars to the west to shift.
Go back to the platforms and get the items off the eastern one,
including a Priest's Bracelet. There's also some items near the lever,
including a Barter Charm.
Look at the map to see where the two traps are that will trigger more
ambushes. Depending on your experience and confidence you want to
either avoid them or seek them out. The trap just to the south of the
western Drake platform causes the appearance of a group of Flame
Hydras, and the other one triggers an ambush by some Gorgons at the
western end of the room.
Once you've finished this area go to the western end of the room, near
the northern wall. Use Move Mountains here to get through another
cracked section of wall, and then immediately use Move Mountains again
to get through the Stalactites and/or Mossy Boulders blocking your path.
On the northern wall of this room, near the middle, is another secret
passage. Going out here takes you onto the ledge that runs around a pit
leading to the Inner Lair of Drakos, but you can't just plunge yourself
down it, nor do I think you'd really want to. Instead, check the
southeastern corner of the ledge for another passage. Ignore the
teleporter, since it will just dump you outside. Go around the corner
and find the ladder leading down to the Inner Lair of Drakos instead.
Once you've reached the Inner Lair the first passage to the west leads
to a fire pit containing an Efreet Pasha. The Pasha will drop a Warmth
Charm when slain, as well as a ruby. Just to the north of the Pasha is
a secret passage leading to a small room containing a Reanimated
Lizard. The Lizards drops some Red Scale Armor, and there's also a
spellbook on the floor, which teaches Arcane Shield Lv.3.
Go back to the main passage and follow it around until it leads to the
west. Enter this room in combat mode, and immediately try to kill any
Basilisks that are in your range. This room has a lot of Basilisks, so
you want to be careful navigating the room or someone's bound to end up
petrified. Once you've cleared the room of Basilisks go over the room
again, this time picking up the potion-making herbs that are scattered
around.
The next room to the east is empty until you get about halfway through,
then you'll suddenly find yourself attacked by a lot of Skeletal
Warriors who are apparently just climbing out of the walls, since
there's so many of them.
Once you've cleared that room head up the passage leading north. You
won't get very far before you're teleported into the middle of a pit of
lava. In the northeast corner of the room is Drakos, the queen of
Drakes, and in the southwest corner is her consort. Once you've killed
both of them, check the room carefully. There's a lot of jewels lying
around, and near the northeast corner is a Return Life Spellshard.
Now head west out of that room and you'll find yourself in Drakos'
Treasure Room. There's some nice items just lying around, and, more
importantly, on a body in the northeast corner you'll find the
Pachtar's Plate Mail. This is the best suit of armor in the game, I
think, and well worth the trouble it took to get.
Now would be a good time to use that teleporter, since you've done
everything you can in the Lair of Drakos, and there's no point in
torturing yourself by going back through the Cloud of Blades again.
|
|
| |
|

